Monday, August 9, 2010

Party Time

This past weekend we celebrated my daughter's 1st birthday, my father's birthday, my aunt and uncle's anniversary and my parents anniversary....whew big party!

(Pictures will come soon, I still need to upload them.)

I decided that some pulled pork was necessary for this party. My wife made a teriyaki marinade for the chicken and we smoked that as well.

For the pulled pork I got 2 8lb pork butts from Sam's. I prepared the meat by cutting off the excess fat. I also injected the meat with salt, apple juice and sugar. For the rub I made a simple pork rub with brown sugar, paprika, cumin, salt pepper and a few other spices. I coated the pork with some yellow mustard and then rubbed on the dry rub. I wrapped in tin foil, and put in a pan in the fridge for about 3 hours.


The chicken we let marinade in the teriyaki sauce overnight.

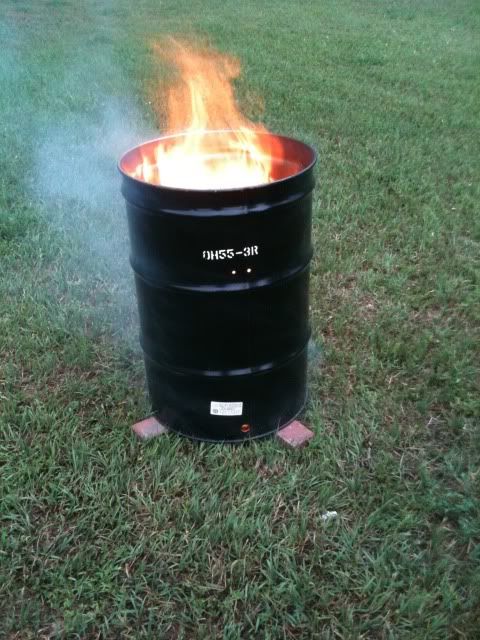
I started my coals at around 11:30 pm friday night and I used the minion method. I put in about half a bag of Stubbs briskets in the charcoal grate along with 3 pieces of hickory. Once the fire was going and the smoker was hot, I put the pork butts on the cooking grate and inserted a temperature probe into each one. I wanted to watch the internal temp of the meat.

I set the thermometers to 200 as that is the temperature I needed.

I checked back on the smoker after about an hour to make sure all  was well. I basted the pork with a mob sauce and covered it back up. The smoker was still rockin steady. I set my alarm for another 2 hours. I cam back after 2 hours and flipped the pork to get a nice even bark on them. The fire was still going nicely at a nice even temp...this smoker is great! I set my alarm again for 3 hours to flip the butts again.

At about 9 am the thermometer read 200 so I pulled them off, wrapped in tin foil and a towel and stuck them in a cooler to let the juices redistribute. An hour later I opened them up and started pulling them apart. The bone practically fell right out and the pork came about so easy. The smell was amazing (and the taste was just as good!) I put the meat in tin pans and covered with tin foil and put back in the cooler until party time.


Meanwhile I had started the coals in my Weber 18" and 22" to cook the chicken. There was a lot of chicken and I needed as much space to get it all done in time for the party. I setup the webers for indirect grilling and put the chicken in all 3 (smoker, and webers). It was pretty cool to see all 3 cookers puffin smoke out of the vents.


The chicken grilled for about an hour and a half and came out looking fantastic and equally delicious...this was going to be a very tasty party!

I love this smoker. It really is a delight to work with and the food comes out amazing. My neighbor came running over when I was pulling the pork and exclaimed "I am so jealous I had to smell that cooking all night long!" I gave her some pork to taste and she loved it.

The pulled pork sandwiches were a hit at the party. There wasn't much leftover.

I can't wait to do it again!

Koopdaddy

Trial run on the new smoker

So in order to get a feel for the new smoker, I needed to do a trial run on it. We had some ribs and chicken in the freezer so I figured that would be a good start.

The chicken quarters I did a lemon pepper dry rub, and a small dose of some random spices. For the pork ribs, I made a rub with a secret ingredient....coffee grounds! I had heard about doing this while watching a cooking show and thought I would give it a try. The rest of the rub was just a basic pork rub with brown sugar, paprika, cumin, coriander, salt, pepper, and garlic. I let the ribs refrigerate with the rub for a few hours.

I loaded up the charcoal basket of the smoker with about 5lbs of charcoal and put in 3 chunks of hickory. I put maybe a dozen coals in my charcoal chimney and lit those. Once they were good and hot I dumped them on top of the unlit charcoal in the drum. I let the drum heat up a bit and when it got to the temperature I was looking for I used kitchen magnets to cover the intake holes on the bottom of the drum. I covered 3 of them and left one wide open. The drum temp was right around 230.

Once that was ready I put the ribs and chicken on the rack and put the cover on.

I had originally planned on serving the ribs for dinner that day, but due to changes in the plans of the day I wasn't able to get the ribs in the cooker in time. So plan B was to grill some chicken breast. I used the same chicken rib as I did earlier and used my 22" weber kettle to grill the breast.

I cooked them over indirect heat approximately 1.5 hours with a little hickory for flavor. They looked and smelled delicious. Earlier in the day I had picked up some Stubb's Wicked Chicken Sauce and thought I would give it a try. As I was basting the chicken I realized that this sauce was a tad spicy...but not overpowering. It was quite delicious actually. I basted the chicken a couple times and then pulled them off the grill.

The chicken came out great. Very tender and moist with a nice pink smoke ring. Yes the sauce had a little kick to it, but even Mary Lou liked it.

Meanwhile, the ribs and chicken quarters continued to smoke. I let the ribs smoke for about an hour and half and then I rotated and flipped them to get a nice even bark. After 3 hours had passed, I wrapped the ribs in foil and basted them with an apple juice based mop I made. I then put them back in the smoker for another 2 hours. At this point I was going to unwrap the ribs and start basting them with some bbq sauce, but the meat was so tender the bones were starting to wiggle loose and I knew the ribs were done. They smelled soooooooo good!

I brought them into the house and even tho we had just finished dinner an hour earlier, everyone wanted to try the ribs. They were so tender and juicy. BBQ sauce not required, although it was very tasty with my Whiskey BBQ sauce.


I call that a successful first smoke on the UDS!

Happy eating,
Koopdaddy

Ugly Drum Smoker

Well life has been busy the last few weeks.

I decided that I needed to build a UDS (Ugly Drum Smoker) since my previous smoking attempt on the Char-Broil left much to be desired. I have been reading on various forums the success that people were having with the UDS and since I knew we were going to be having a party, I needed to try it out.

The Basic concept of a UDS is a 55 gallon steel drum. Many people find them used on craigslist or through recycle centers. They then have to put some labor of love into them to get the drum ready for cooking uses. Since I was short on time, and was unable to find a used drum locally, I decided to just order a brand new drum in order to save a few steps in the building process.

My new drum arrived safe and sound.


In order for the drum to work as a smoker, I needed to drill some ventilation holes, construct a charcoal basket and mount a cooking grate. Anything else beyond that is not required to operate a drum smoker, but can certainly enhance the features and look of the drum. Since I was short on time, I went as basic as I could. Down the road I plan on adding some modifications to the drum to make it more efficient.

The first thing I needed to do was mark my intake holes on the drum, about 2 inches above the bottom. I made 4 x 1" intake holes. These holes will allow me to control the air intake of the drum and therefore control my fire and temperature...which is the most important feature of a good smoker.


Once the intakes holes were done, I needed to drill some venting holes in the top lid. Based on what I researched online, I needed to drill 8 x half inch holes. My friend Eric helped me with that.


We then built a hot fire to let it burn off any chemicals or residue in the drum that would be unsafe. Big Fire!

Next I constructed my charcoal basket. I used 18 gauge expanded steel (stainless steel only....never use galvanized or zinc coated). The steel came in 2 sheets 12 x 24. I took the charcoal grate from a Weber 18" grill and wrapped the expanded steel around that. I used stainless bolts to keep the steel formed and used stainless steel wire to tie the steel to the coal grate.

I used 3" bolts to life the coal grate up off the floor of the drum. This allows air to come up underneath the fire as well as allows room for the charcoal ash to fall through the grate and not block the air flow.

I then drilled some holes for the cooking grate. I wanted to use U-bolts to hold up the grate for a future plan of mine, but a standard bolt will do just fine as well. The last thing I did was mount a handle on the lid. I do not have any pictures of the handle at this time.

So that was my quick UDS build.

Enjoy,
Jared